

So, if everything went according to plan, you should have something like this:
 The surfaces of the drum will feel rough and will be free of rust, paint and residue. If you haven't yet drilled the air intake hole in the bottom of the drum, do so now.
You'll want this hole to be as round as possible and just barely big enough for the intake pipe to fit through. Try to avoid having too much of a gap as it will allow air into the drum later on and make your fire harder to control.
 Start by marking the center of the drum:
At this point, it's also a good idea to make 2 perpendicular lines across the bottom of the drum.
Be sure to make them as straight and even as possible. They should divide the drum into 4 identical sections.
 Then, use a t-square to continue the lines all the way down the drum. These lines will be used later for our cooking grate support brackets.
 Now cut out the hole using a uni-bit or by drilling a 3/8" hole with a regular drill bit and cutting out the circle with a sabre saw and a metal cutting blade.
After that, test fit a piece of pipe and make sure the gap isn't too big. If it is, don't worry. we can fix it later.
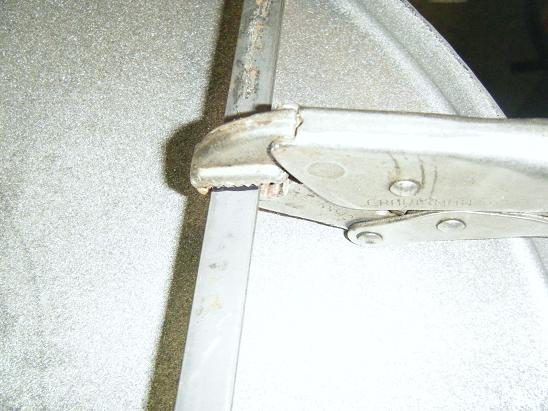 Next, take one piece of the 3/4" flat stock and makr the center. Then bend the stock completely back on itself along that line. If you don't have a sturdy bench, or vise, u can use a pair or vise-grips to make sure the bend is straight.
 You may need to flatten out the bend with a hammer. After you're done, it should look like this:
 Next, drill a 1/4" hole approx 3/4" from the bend.
 Once that's done, bend the arms of the stock outward to form a "V" shape. Try to keep the angles as even as possible. This will become the Shaker Bar.
Next, position the Shaker Bar over the hole in the bottom of the drum like this.
Line the Shaker Bar up so that it is about 1/2" away from the drum lip and arms are the same distance from the intake hole.
Make 2 marks on the end of each arm at 2" and 3" away from the lip of the drum. Cut the end of the arm off at the 2" mark and bend at the 3" mark.
Try to keep the bent ends as straight and parallel to each other as possible to make sure the Shaker Bar functions like it's supposed to.
 After that, drill 1/4" holes in the end of each arm 1/2" from the end.
When you place the Shaker Bar back on the bottom of the drum, no part of it should be touching the lip.
Mark where the centers of the holes in the arms are.
 Next, attach 2 of the 1" "L" brackets to the end of each arm using pop-rivets.
The "L" brackets will be on pretty tight, but if you swivel them around a few times, they will loosen up.
Place the Shaker Bar back on the bottom of the drum and line up the holes in the bottom of the "L" brackets with the marks of the centers you made earlier. Mark where the holes are and drill them out.

Now set the Shaker Bar aside .
Next, Take the 1/2" round steel axel rod and place it on the bottom of the drum, to the side of where the shaker bar would be.
Draw a line parallel to the center line, approx 3" away from the outher edge of the drum. This line will be the outside edge of where the axle will go.
Next, lay the axle across the bottom of the drum, aligning it with the line you just drew. Now mark the bottom lip of the drum where the axle touches it.
These line are where we will notch out the lip of the drum from the axle.
There are a number of ways you can notch out the lip of the drum; you could use an angle grinder, dremel, sabresaw or even a hacksaw. Just be careful to stop when you reach the drum bottom.

If you cut too far down, you will end up with a gap, which will let air into the drum. It can be be patched up later, but it's better to just be careful in the first place.
 After you cut your notches, your axle rod should lay in them, flat against the bottom of the drum like this:
Now, fasten the axle rod to the bottom of the drum using two copper pipe fasteners. You may want to use a pair of pliers and re-bend the fasteners to better fit the axel rod.
Mark where the holes for the fasteners are, drill and attach with pop rivets.
 It should look like this when you're done:
Now, we fabricate the front leg.
Take the 1 1/4" piece of flat stock and mark it like so, starting from one end:
-5" (align this mark with the bottom of the drum)
-9 3/4" (bend a 90* angle here)
-11 3/4" (bend an approx 45* angle here)
-18 3/4" (bend an opposing 45* angle here)
-21 3/4" (cut off at this mark)

If you've done it right, your piece should look like this:
Place the leg against the side of the drum opposite the axle, centered with the line, and align the 5" mark with the bottom of the drum. The distance from the bottom of the drum to the top of the leg should be equal to the distance from the bottom of your wheel to the top of the axle hole minus 1/2".
If it's not, adjust your bends until it is, then mark and drill 2 holes in each end of the leg and attach it to the drum using the 1" long hex bolts.
 This is a good time to test fit some pieces and make sure everything is spaced right. Flip the drum upside-down again and slide the wheels onto the axle rod. Take your air inlet pipes and set them in place, in the center hole. Then take a piece of steel or ruler and set it on top of the wheels. There should be plenty of clearance:
 Now, remove the intake pipe and flip the drum upright. It should be relatively level. The side with the leg will be about 1/2" lower than the side with the wheels, but that's ok.
 Next, on each of the 4 lines that run down the side of the drum, make a mark 6" from the top of the drum, 12" and 16". Then, take one of the 2" "L" brackets and using the marks we just made as the top hole, make where all the bottom holes will go.
Then, drill out all the holes with a 1/4" dit, de-burr, and attach the "L" brackets to the inside of the drum using pop rivets.

Then, mark athe appoximate curve of the ring onto the brackets. This is where we'll cut them to fit. To make it easier, you might consider screwing the brackets to a scrap piece of wood so they don't wobble around.
 I cut my brackets with a hacksaw, but you could just as easily use a dremel or angle grinder. I don't suggest using a sabre saw as it tends to bend the brackets out of shape.
Next, hold the brackets up to the drum, flush with the top ring. You want them to be about 5" away from the line. Now mark where the holes are, drill, and attach them using either rivets or machine screws.
I used machine screws just because they are a little stronger and longer.
After that, remove the wheels again and give the whole drum a quick rub-down with sandpaper to prepare it for paint.

Give the outside of the drum a few good coats of your primary color. I used the traditional BBQ color; black.
Make sure to get the undersides of the rings; they can easily be missed, leaving you with bare spots.
I used 2 whole spray cans of High-temp BBQ paint for this part alone and another 3/4 of a can for the lid. You don't need to paint the inside of the drum or the underside of the lid.


Once the paint is all thoroughly dry, take a piece of 3/16" round stock and bend a hook at one end.
 Then, at the other end, bend a handle.
Insert the hole we drilled in the end of the Shaker bar and then rivet the arms of the Shaker Bar to the inside bottom of the drum with rivets.
Loosely attach the rod to the inside of the drum with eye-bolts or bent over machine screws. Make sure there is plenty of clearance for the rod
and Shaker bar to move up and down.

It should look like this when you're done:

Next, drill a hole into the intake pipe about 1/2" from the end. Then, attach a 2" machine screw with a nut.

Use a pair of pliers or vise-grips to bend a 90* angle.
This is where the intake baffle will attach later.

Here's where an extra set of hands will come in useful.
Separate the pipe hangers and attach the bottom part to the drum using the holes in the rings we drilled earlier.
Insert a 2" hex bolt thru the hole, then a washer and nut. Tighten as much as you can, then screw the bottom of the pipe hangers onto the bolts.
If you lay the intake pipe on the hangers, the hole in the second elbow should line up with the hold we cut in the bottom of the drum. If it doesn't, adjust the pipe hangers until it does, then attach the tops of the pipe hangers using the provided screws and tighten down.

Next, screw the 2" conduit nut onto the 4" nipple as far as it will go. Insert the end of the nipple with the conduit nut on it into the elbow on the bottom of the drum, from the inside and tighten it as far as possible.
Then, screw the conduit nut down to the bottom of the drum. This will support much of the weight of the intake pipes, so make sure it is as tight as you can get it.

Now that the intake pipe is installed, it's time to attach the wheels.
First, slide a washer onto one end of the axle, then a wheel, then another washer. Leave about 1/2" to 3/4" between the outside washer and the end of the axle, then mark for a hole. Slide everything together, using that mark as a stopping point, and mark for another hole right next to the inside washer.
At each of these marks, drill a 1/8" hole, then reassemble everything (if needed) and insert a cotter pin into each of the holes and bend them over. You should now have 1 wheel completely attached. Slide the axle thru until the attached wheel is about 1/2" from the drum body, then repeat the process for the other wheel. Trim off any extra length of the axle if needed.
Also, drill a hole near the outside of the leg we bent and install a replacement chair pad. these are pretty readily available and usually come in packs of 4. After that, flip the drum right-side up.
 After attaching the chair pad, the rig should now sit pretty much level. If you raise up the rig by the shelf brackets, it should tilt back pretty far. You may be able to get it up a foot or more off the ground. This will be important later on.
Next, take your 18" x 18" piece of 3/4" wood and trace the contour of the drum onto one side of it. On the opposite side, draw a handle hole approx 2" by 5" and 2" from the edge. You can also round all the corners like I did.
Make your cuts using a sabresaw or band-saw. You should end up with something like this:

After a good sanding to remove any hard edges (especially around the handle), paint or varnish the shelf in the color of your preference. I used black because I happend to have some left over from my last build.
When the paint's all dry, attach the shelf to the brackets on the drum using 1/2" wood screws. I also drilled 2 additional holes thru each shelf bracket for added strength.
Step 4B- Building the coal basket
You can use just about any basket you like that fits inside of your drum. I found a cheap peg-board basket online, so that's what I used. Whatever you use, the idea is the same, but you may have to adjust the size of the ash-pan to make it work.
First, draw lines 3" from each of the short ends of a 12" x 18" sheet of steel. You should have a 12" x 12" square in the middle. Bend 90* angles on each of these lines. From the second sheet of steel, cut 3 strips 4" wide. From 2 of these strips, cut 2- 4" x 15" sides for the ash pan. Bend a 90* angle 1" in from one of the long sides and 90* angles 1" in from each of the short sides. You may need to cut the corners out to get them even. Repeat for the other strip. You should now have a 12" x 3" side panel with 3- 1" tabs bent over. Drill some holes and attach the sides to the other sheet of steel with rivets. You should now have a 12" x 12" x 3" square pan, similar to this:

Now, flip the pan over, mark the center of the bottom and cut out a 2 3/4" diameter hole.
Take your third strip of steel and mark a line 1 1/2" from the long side. Mark out 3- 1" wide spaces on the 1 1/2" side to use as tabs. Cut out the sheet steel from in between the tabs. At one end, bend the sheet approx 1" from the end and roll the steel up to create a tube.
Make the tube just barely big enough to fit inside of the hole we cut in the bottom of the ash pan. Mark another tab, bend, and fasten the 2 tabs together with rivets.
 Then, insert the tube into the hole in the ash pan and bend the tabs over. It should look like this:

Next, drill a hole into each tab and attach the tube to the bottom of the ash pan with rivets:
After that, place your basket on top of the ash pan and mark where your bolts will go. Then, attach the basket to the ash pan using the 5" bolts, washers and nuts.
It should go in this sequence:
Bolt, washer, ash pan, washer, nut, nut, washer, basket, washer, nut. You'll want to leave about 1" between the top of the ash pan and the bottom of the basket for air flow. When you're done, it should look like this:
 You can also bend a piece of 3/16" round stock to make a handle, like I did.
You'll want to take a piece of scrap sheet steel and rivet it to the middle of the basket to keep ashes from falling into the intake pipe. You can also use a bit of JB Weld to fill in any gaps between the tube and the bottom of the pan.
Step 4C: Hinges & final assembly
Then, take another piece of scrap steel and trace a pipe nipple onto it. Draw a tear-drop shape slightly bigger than the circle to serve as the intake baffle. Drill a hole to accomodate the machine screw we installed. It should look like this:

You can use and abrasive disk on your dremel or a bench grinder to smooth the edges. The a quick sanding and paint and it's ready to attach to the intake pipe.
Next come the hinges.

This is what you should end up with:

Ok, now mark 2 perpendicular lines thru the underside of the drum lid.then, mark 2 lines that are parallel, 3" away from the center. These are the lines we will use to mount the hinges.
Mark a line 5 3/4" from the inside lip of the drum lid and then mark where the holes for the "L" brackets are for each hinge, and drill them out.
Then. place your handles where you want them, mark and drill those holes also.

On the drum, make 2 marks 3" on either side of the center line. Align the ends of each hinge with these lines, approx 1" from the top lip. Mark where the holes in the "L" brackets are on the drum. Drill and rivet the hinges in place.
The hinges should now be in a "V" shape because the drum is round. Gently bend the hinges out so that they are parallel.

Then, you may want to have a friend hold the drum lid up while you rivet the hinges to the lid. After that, rivet your handles to the lid as well. Then, bracing the lid with the handles, screw your exhause pipe and elbow into the center bung in the lid. If everything was done correctly, you should end up with this:
All that's left is to install the thermometers.

For this, you'll need your thermometers, 2- 1/4" x 1/4" hose barbs and 2 caps that fit the threaded ends of the barbs. Washers are also recommended to make sure the barbs and caps screw tightly together with the drum wall.
First, you'll drill 2- 1/2" holes about 1" under the top of the "L" brackets and about 1" off to the side. Next, drill a hole thru the center of each cap that is just barely big enough for the thermometer probes to fit thru.
Then, put a washer over the threaded end of the barb and put it thru the hole in the side of the drum. You may need to add another washer on the outside of the drum depending on how think they are. After that, screw on one of the caps and snug it up with a wrench.
This is what it'll look like if you do it right:

The thermometers should be able to slid in and out of the fittings easily. The protrusion on the inside will support the weight of the thermometers.
Now would be the time to seal up any gaps or holes in the drum body. If you don't want to use JB Weld, you could also use 100% silicone caulk. It will withstand the heat and is food safe.
You can also apply a thin layer of silicone to the lip in the lid where it contacts the top of the drum to act like a gasket. Just make sure it is flat and even or it will make an even bigger gap and allow more smoke and heat to escape.
If you have additional 3/16" round stock, you could bend up some handles for your cooking grates. You'll need about 18" of rod for each handle; 2 handle per grate. Unfortunately, I don't have any pics of this part.
Other than that, just sit back proudly, and marvel at the beautiful piece of BBQ hardware you've just built!


Happy Smoking!
No comments:
Post a Comment